Welcome to my artist statements
Best Motion Shot
 Title
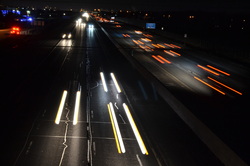
Shutter Speed:1/2 F-Stop:10
Title
Shutter Speed:1/2 F-Stop:10
Artist Statement
While I was capturing this photo, I had to keep the principles of design close in mind throughout the process in order to create a well-rounded photo. One of the principles that can be spotted immediately is the use of repetition involving the cars' headlights. The large use of this techniques creates depth among the piece which allows the viewer eyes to take in several different elements while scanning the photo instead of just focusing on one main subject. This sparks more interest in the viewer because their minds tend to wander when presented with monotonous, single-subject photos. Another principle that I relied heavily on while capturing this image was contrast. The main source of contrast within this photo is through varying light and dark elements. For example, it is clear that the cars' oncoming headlights emit very bright white-yellow lights, while the taillights on the opposite side of the highway give off a dull red shine. In addition to these two contrasting colours, the darkness of the nighttime in the background provides a very major contrast compared to the others. Combining all of these elements not only adds the contrast of the colours but also gives layers and depth to the image as well. Additionally, I used my birds-eye-view viewpoint from the top of the overpass to capture the true motion of this image. From this high perch I was able to get a wider, longer perspective, capturing more cars and incorporating the element of leading lines (the large amount of highway space that I captured leads the viewer's eyes gradually to the back of the photo). If I had simply tried to take this photo from a head-on viewpoint, I wouldn't have been able to get nearly as many lights or depth.
Throughout the creation process of this photo, it seemed as if I encountered many more challenges and failures than successes. One of the greatest difficulties that I had was camera shake! Despite the warning on the project handout about using a tripod or a solid-non-moving surface while taking a subject-motion blur photo to avoid this exact issue, I deliberately ignored it (for lack of a tripod or any non-moving surface while out on a cold overpass, and obviously my self-proclaimed superiority). Admittedly, this was not a well thought-out choice and of course I ended up with several ridiculously blurry, "shaky" pictures. In my frustration I ended up just holding the shutter to make full use of the continuous shot setting. Miraculously, I managed to get this image among the shaking, which perfectly captured the idea of subject-motion blur photography with the lights of the cars.
I chose this particular photo as my favourite and best image of all of the motion pictures that I took because I love the major contrasting tones and colours throughout it. The Bright lights of the oncoming headlights provides a very bold element that draws the viewers eyes in immediately. Eventually, they are captivated by the other focal points of the picture such as the descending red lights, the lights on the buildings to the left of the photo etc. Additionally, I really like the way the highway lines naturally lead the viewers eye towards the back of the image. Finally, I love how the bright white lights highlight the natural lines and imperfections of the highway cement.
Best Optical Illusion Shot
 "MAJESTY"
Shutter speed:1/2000 F-stop:5.6
"MAJESTY"
Shutter speed:1/2000 F-stop:5.6
Artist Statement
The most prominent principle of design that I used to capture this photo is contrast. i took the image from a perspective that would allow the natural lighting from the stain glass window to shine through, making the eagle very bright and Ashley as a silhouette. This principle really draws the viewers eyes straight to the eagle, being the main subject, and then slowly to Ashley, following the lines of her body. After I took the photo, I needed to rely on the element of cropping to complete the image. The original picture that I captured had excess background "noise" on the right, containing pieces of the door and the outside landscape beyond it. This allows the viewer to focus on the main subjects of the picture without getting distracted by small, meaningless features.
While I was trying to capture this image I faced several failures and difficulties. I had to retake the picture several times because I was not getting the desired "silhouette" effect. Despite my head-on perspective, I continually got shots where part of Ashley's body was too clear or the eagle was too dull and colourless in comparison to the darkness of her shadow. On the other hand, I feel like I achieved a major success in capturing this image. After my first few failed attempts, I started getting some photos that were coming close to the "look" that I desired. Then it was just a matter of trying different angles, positions and points of view, until I finally captured this picture.
I chose this as my best photo among the five Optical Illusion pictures I took because of a combination of the previously mentioned elements and simply because I find it very bold and striking compared to the others. This photo not only captures the idea of optical illusion photography with the eagle "landing" on Ashley's arm, but it also provides a creative impact that none of the other images had. In addition, I had a lot of fun just taking this image so I appreciate the photo for its visual appeal and also for the memories that I made while creating it. Overall, I am extremely happy with how this picture turned out and I believe that it is one of the best images that I have taken during this semester.
